Linux CentOS7 1708 安装 Nginx-1.14 PHP-7.2.5 MariaDB-10.2.14 打造 WordPress-4.9.5 个人博客
目标:
1,了解 LNMP 的工作原理
2,不依赖在线 yum 源码编译安装 LNMP。
3,保证搭建出和我一样的 LNMP 环境
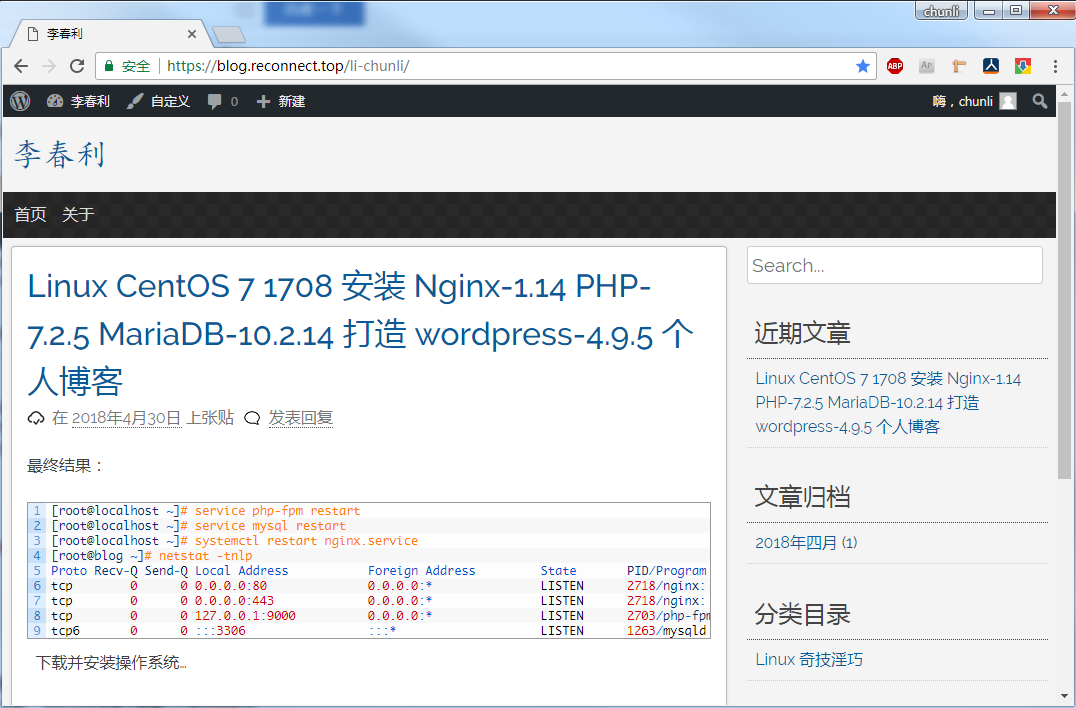
效果图
下载并安装操作系统

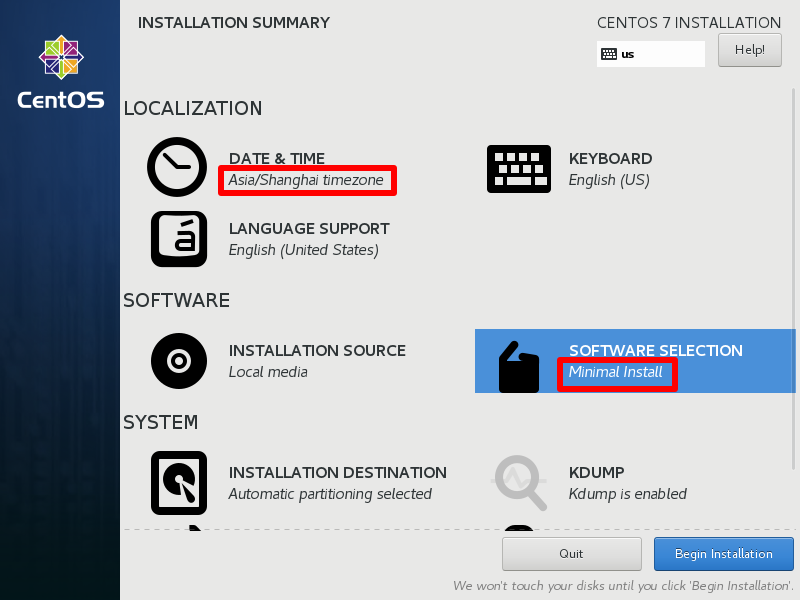
mini 安装
挂载CentOS 1708 镜像
1 | |
使用 ISO 配置离线 yum
1 | |
防火墙设置
1 | |
Nginx 编译
1
2
3
4
5
6
7
8
9
10
11
12
13
14
15
16
17
18
19
20
21
22
23
24
25
26
27
28
29
30
31
32
33
34
35
36
37
38
39
40
41
42
43
44
45
46
47
48
49
50
51
52
53
54
55
56
57
58
59
60
61
62
63
64
65
66
67
68
69
70
71
72
73相关依赖
[root@localhost ~]# yum install -y gcc
[root@localhost ~]# yum install -y pcre-devel
[root@localhost ~]# yum install -y perl-ExtUtils-Embed
[root@localhost ~]# yum install -y openssl-devel
下载并编译安装
[root@localhost ~]# mkdir nginx
[root@localhost ~]# cd nginx
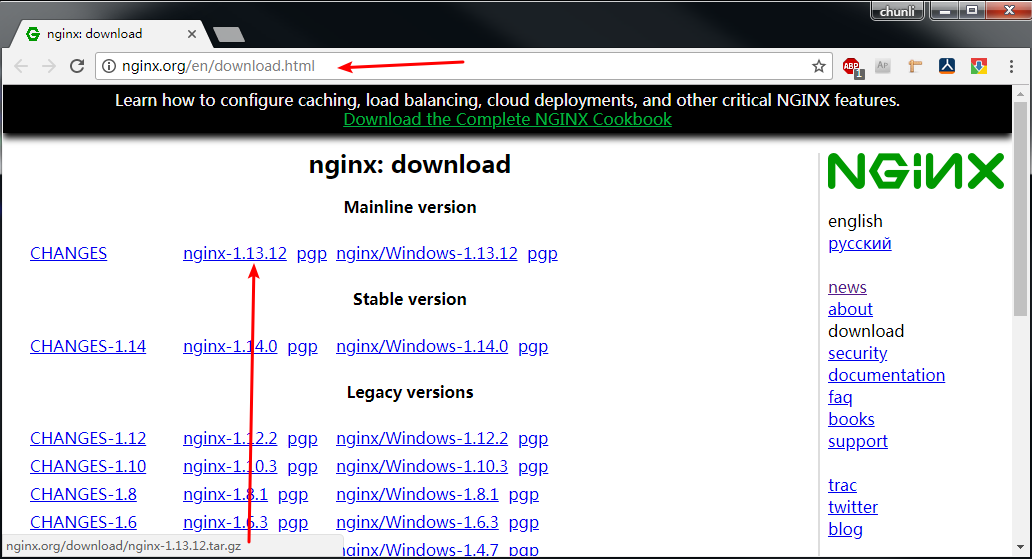
[root@localhost nginx]# wget http://nginx.org/download/nginx-1.14.0.tar.gz
[root@localhost nginx]# md5sum nginx-1.14.0.tar.gz
2d856aca3dfe1d32e3c9f8c4cac0cc95 nginx-1.14.0.tar.gz
[root@localhost nginx]# tar xf nginx-1.14.0.tar.gz
[root@localhost nginx]# cd nginx-1.14.0
[root@localhost nginx-1.14.0]# \
./configure --prefix=/opt/nginx \
--with-http_ssl_module \
--with-http_v2_module \
--with-http_realip_module \
--with-http_addition_module \
--with-http_dav_module \
--with-http_flv_module \
--with-http_mp4_module \
--with-http_gunzip_module \
--with-http_perl_module
[root@localhost nginx-1.14.0]# make && make install
启动运行,测试
[root@localhost nginx-1.14.0]# chown -R nobody:nobody /opt/nginx/
[root@localhost nginx-1.14.0]# /opt/nginx/sbin/nginx
[root@localhost nginx-1.14.0]# netstat -tnlp
Active Internet connections (only servers)
Proto Recv-Q Send-Q Local Address Foreign Address State PID/Program name
tcp 0 0 0.0.0.0:80 0.0.0.0:* LISTEN 9283/nginx: master
tcp 0 0 0.0.0.0:22 0.0.0.0:* LISTEN 1008/sshd
tcp 0 0 127.0.0.1:25 0.0.0.0:* LISTEN 1564/master
tcp6 0 0 :::22 :::* LISTEN 1008/sshd
tcp6 0 0 ::1:25 :::* LISTEN 1564/master
[root@localhost nginx-1.14.0]#
[root@localhost nginx-1.14.0]# curl http://localhost/
<!DOCTYPE html>
<html>
<head>
<title>Welcome to nginx!</title>
添加开机自启
[root@localhost ~]# vim /usr/lib/systemd/system/nginx.service
[Unit]
Description=nginx - high performance web server
After=network.target remote-fs.target nss-lookup.target
[Service]
Type=forking
ExecStart=/opt/nginx/sbin/nginx -c /opt/nginx/conf/nginx.conf
ExecReload=/opt/nginx/sbin/nginx -s reload
ExecStop=/opt/nginx/sbin/nginx -s stop
PrivateTmp=true
[Install]
WantedBy=multi-user.target
[root@localhost ~]# pkill -f -9 nginx
[root@localhost ~]# systemctl enable nginx.service #开机自启
[root@localhost ~]# systemctl start nginx.service #启动服务
[root@localhost ~]# systemctl status nginx.service #检查状态
[root@localhost ~]# reboot #重启
[root@localhost ~]# netstat -tnlp #验证,可以看到,开机自启
Proto Recv-Q Send-Q Local Address Foreign Address State PID/Program name
tcp 0 0 0.0.0.0:80 0.0.0.0:* LISTEN 3202/nginx: master
[root@localhost ~]#
编译安装 php
1
2
3
4
5
6
7
8
9
10
11
12
13
14
15
16
17
18
19
20
21
22
23
24
25
26
27
28
29
30
31
32
33
34
35
36
37
38
39
40
41
42
43
44
45
46
47
48
49
50
51
52
53
54
55
56
57
58
59
60
61
62
63
64
65
66
67
68
69
70
71
72
73基本依赖:
[root@localhost ~]# yum install -y libxml2-devel
[root@localhost ~]# yum install -y libpng-devel
PHP 编译
[root@localhost ~]# mkdir php
[root@localhost ~]# cd php/
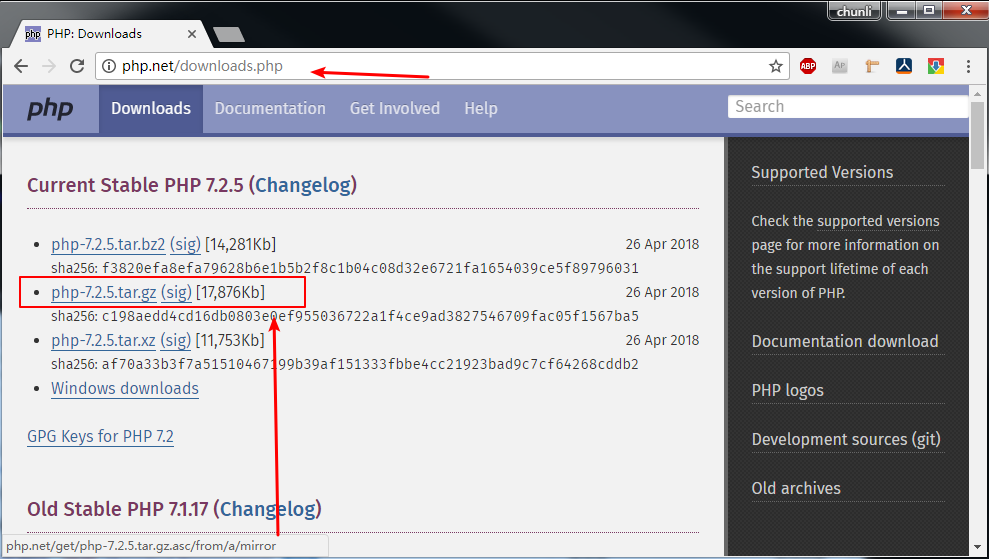
[root@localhost php]# wget http://am1.php.net/get/php-7.2.5.tar.gz/from/this/mirror -O php-7.2.5.tar.gz
[root@localhost php]# md5sum php-7.2.5.tar.gz
e9bede5ea2cbb2e3a2581d38316c9356 php-7.2.5.tar.gz
[root@localhost php]# tar xf php-7.2.5.tar.gz
[root@localhost php]# cd php-7.2.5
[root@localhost php-7.2.5]# \
./configure \
--prefix=/opt/php \
--enable-fpm \
--with-mysql-sock=/tmp/mysql.sock \
--enable-embedded-mysqli \
--with-mysqli \
--with-zlib \
--with-openssl \
--with-iconv \
--with-gd
[root@localhost php-7.2.5]# make && make install
测试 php 程序
[root@localhost php-7.2.5]# echo '<?php phpinfo(); ?>' > /tmp/test.php
[root@localhost php-7.2.5]# /opt/php/bin/php /tmp/test.php
phpinfo()
PHP Version => 7.2.5
System => Linux localhost.localdomain 3.10.0-693.el7.x86_64 #1 SMP Tue Aug 22 21:09:27 UTC 2017 x86_64
Build Date => Apr 30 2018 19:27:25
Configure Command => './configure' '--prefix=/opt/php' '--enable-fpm' '--with-mysql-sock=/tmp/mysql.sock' '--enable-embedded-mysqli' '--with-mysqli' '--with-zlib' '--with-openssl' '--with-iconv'
Server API => Command Line Interface
Virtual Directory Support => disabled
Configuration File (php.ini) Path => /opt/php/lib
Loaded Configuration File => (none)
Scan this dir for additional .ini files => (none)
Additional .ini files parsed => (none)
PHP API => 20170718
PHP Extension => 20170718
Zend Extension => 320170718
Zend Extension Build => API320170718,NTS
PHP Extension Build => API20170718,NTS
Debug Build => no
Thread Safety => disabled
Zend Signal Handling => enabled
Zend Memory Manager => enabled
Zend Multibyte Support => disabled
IPv6 Support => enabled
DTrace Support => disabled
php-fpm 开机自启
[root@localhost php-7.2.5]# cp ./sapi/fpm/php-fpm.conf /opt/php/etc/
[root@localhost php-7.2.5]# cp ./sapi/fpm/www.conf /opt/php/etc/php-fpm.d/
[root@localhost php-7.2.5]# cp ./sapi/fpm/init.d.php-fpm /etc/init.d/php-fpm
[root@localhost php-7.2.5]# chmod +x /etc/init.d/php-fpm
[root@localhost php-7.2.5]# chkconfig --add php-fpm
[root@localhost php-7.2.5]# chkconfig php-fpm on
[root@localhost php-7.2.5]# service php-fpm restart
[root@localhost php-7.2.5]# netstat -tnlp | grep php-fpm
tcp 0 0 127.0.0.1:9000 0.0.0.0:* LISTEN 84988/php-fpm: mast
[root@localhost php-7.2.5]#
[root@localhost php-7.2.5]# reboot #重启验证
[root@localhost php-7.2.5]# netstat -tnlp #看到 9000 端口监听成功
Proto Recv-Q Send-Q Local Address Foreign Address State PID/Program name
tcp 0 0 127.0.0.1:9000 0.0.0.0:* LISTEN 41270/php-fpm: mast
配置nginx 如何使用php-fpm
1 | |
编译安装 MariaDB
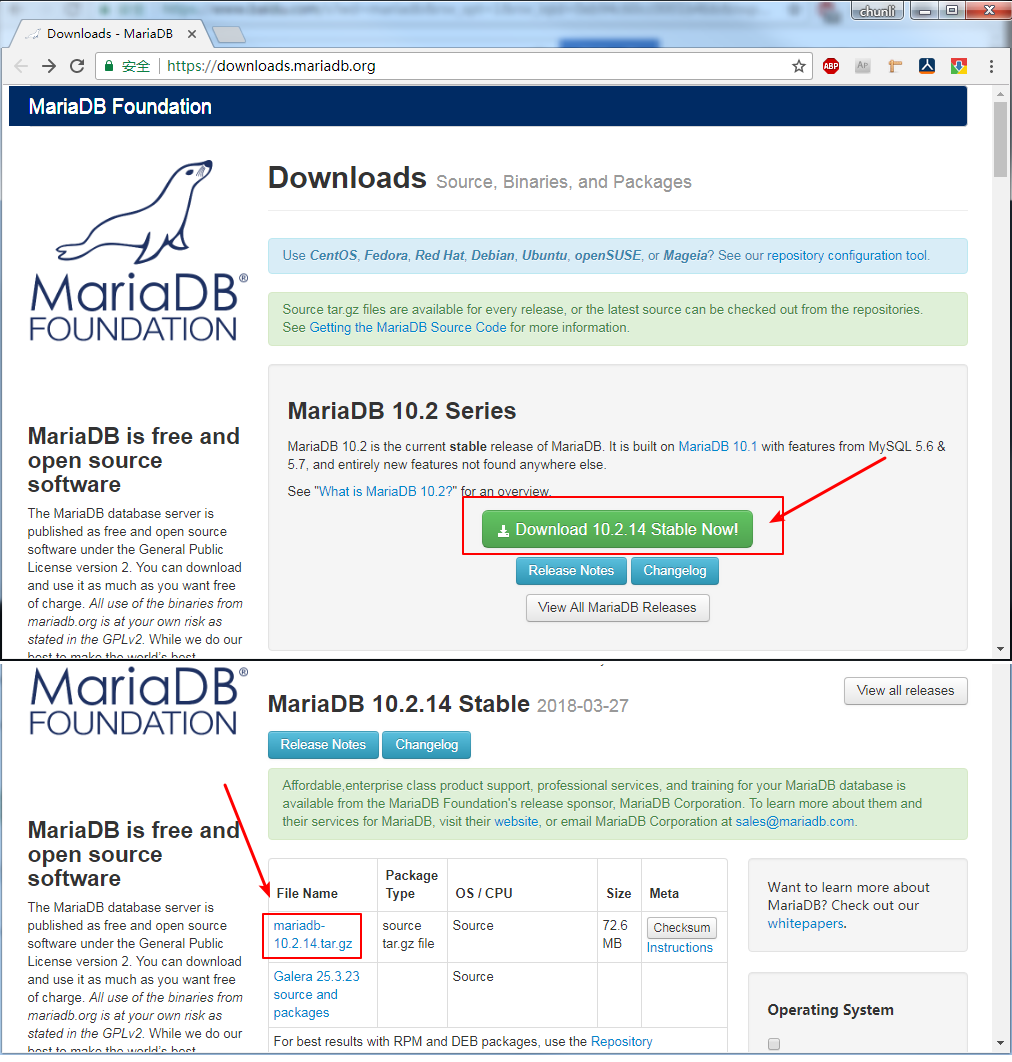
1
2
3
4
5
6
7
8
9
10
11
12
13
14
15
16
17
18
19
20
21
22
23
24
25
26
27
28
29
30
31
32
33
34
35
36
37
38
39
40
41
42
43
44
45
46
47
48
49
50
51
52
53
54
55
56
57
58
59
60
61
62
63
64
65
66
67
68
69
70
71
72
73
74
75
76
77
78
79
80
81
82
83
84
85
86
87
88
89[root@localhost ~]# yum install -y gcc-c++
[root@localhost ~]# yum install -y cmake
[root@localhost ~]# yum install -y ncurses-devel
编译 MariaDB
[root@localhost ~]# useradd -s /sbin/nologin -M mysql
[root@localhost ~]# mkdir mariadb
[root@localhost ~]# cd mariadb
[root@localhost mariadb]# wget http://mirrors.neusoft.edu.cn/mariadb//mariadb-10.2.14/source/mariadb-10.2.14.tar.gz
[root@localhost mariadb]# md5sum mariadb-10.2.14.tar.gz
d98cce6f3c0e2971afa061fc67183b91 mariadb-10.2.14.tar.gz
[root@localhost mariadb]# tar xf mariadb-10.2.14.tar.gz
[root@localhost mariadb]# cd mariadb-10.2.14
[root@localhost mariadb-10.2.14]# rm -rf CMakeCache.txt
[root@localhost mariadb-10.2.14]# \
cmake . \
-DCMAKE_INSTALL_PREFIX=/opt/mariadb \
-DMYSQL_DATADIR=/opt/mariadb/data \
-DMYSQL_UNIX_ADDR=/tmp/mysql.sock \
-DDEFAULT_CHARSET=utf8 \
-DDEFAULT_COLLATION=utf8_general_ci \
-DWITHOUT_TOKUDB=1 \
-DWITH_SSL=system \
-DWIYH_READLINE=1 \
-DWITH_INNOBASE_STORAGE_ENGINE=1 \
-DWITH_ARCHIVE_STPRAGE_ENGINE=1 \
-DWITH_BLACKHOLE_STORAGE_ENGINE=1 \
-DWITH_READLINE=1 \
-DWITH_ZLIB=system \
-DENABLED_LOCAL_INFILE=1
[root@localhost mariadb-10.2.14]# make -j 4 && make install
[root@localhost ~]# cd /opt/mariadb/
[root@localhost mariadb]# rm -rf /etc/my.cnf
[root@localhost mariadb]# cp support-files/my-large.cnf /etc/my.cnf
初始化一个数据库实例
[root@localhost mariadb]# ./scripts/mysql_install_db --user=root --basedir=/opt/mariadb --datadir=/opt/mariadb/data --defaults-file=/etc/my.cnf
启动测试:MySQL 启动 这个实例
[root@localhost ~]# /opt/mariadb/bin/mysqld \
--user=root \
--basedir=/opt/mariadb \
--datadir=/opt/mariadb/data \
--plugin-dir=/opt/mariadb/lib/plugin \
--log-error=/opt/mariadb/data/localhost.err \
--pid-file=/opt/mariadb/data/localhost.pid \
--socket=/tmp/mysql.sock \
--port=3306
[root@localhost mariadb]# netstat -tnlp # MySQL 启动成功
Proto Recv-Q Send-Q Local Address Foreign Address State PID/Program name
tcp6 0 0 :::3306 :::* LISTEN 28662/mysqld
[root@localhost mariadb]# Crtl + \ # 退出 MySQL
MariaDB 开机自启
[root@localhost ~]# chown -R mysql:mysql /opt/mariadb/
[root@localhost ~]# rm -rf /etc/init.d/mysql
[root@localhost ~]# cp /opt/mariadb/support-files/mysql.server /etc/init.d/mysql
[root@localhost ~]# rm -rf /etc/my.cnf
[root@localhost ~]# cp /opt/mariadb/support-files/my-large.cnf /etc/my.cnf
[root@localhost ~]# chkconfig mysql on
[root@localhost ~]# chkconfig mysql on
[root@localhost ~]# service mysql start
[root@localhost ~]# netstat -tnlp |grep mysqld
tcp6 0 0 :::3306 :::* LISTEN 22783/mysqld
[root@localhost ~]#
注意这里有坑:需要创建一个名 为 mysql 的用户,否则 MariaDB 无法启动,
原因是 如果没有 mysql 用户,或者没有/opt/mariadb/的运行权限,无法启动
MariaDB 默认是关联 mysql 用户,所以最省事儿的就是创建 mysql 用户, 并 授权。
登录测试并修改密码
[root@localhost ~]# /opt/mariadb/bin/mysql
MariaDB [(none)]> use mysql;
MariaDB [mysql]> UPDATE user SET password = PASSWORD('new_password') WHERE user = 'root';
MariaDB [mysql]> FLUSH PRIVILEGES;
MariaDB [mysql]> exit
[root@localhost ~]# /opt/mariadb/bin/mysql -p #验证
Enter password: 输入新的密码 new_password
MariaDB [(none)]>
WordPress 安装
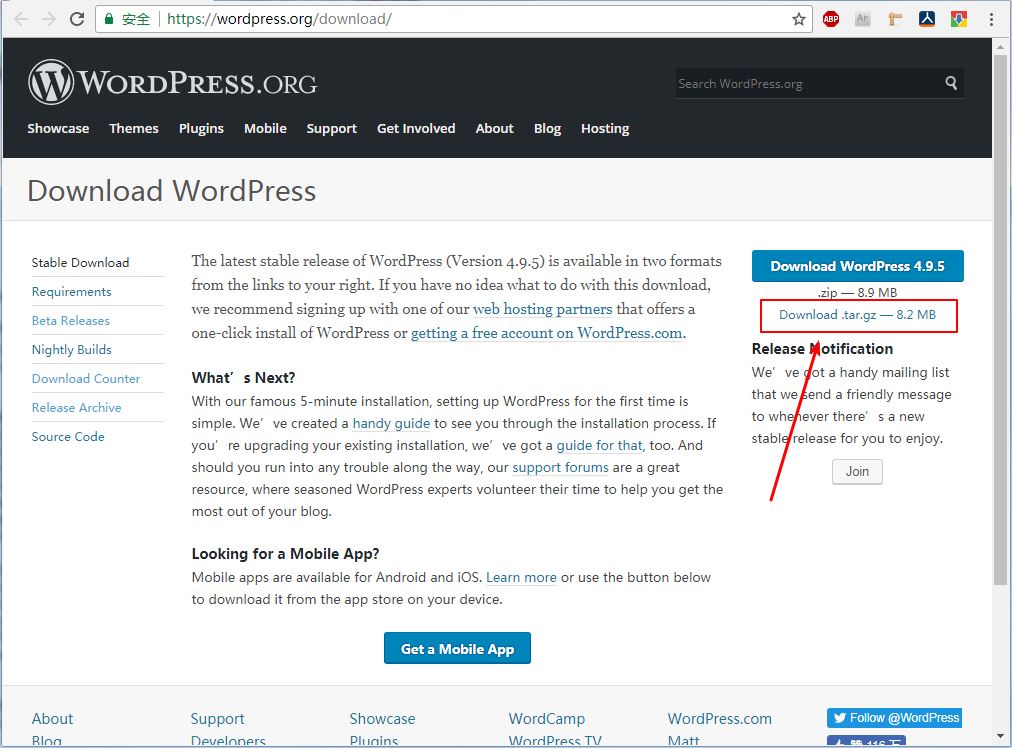
安装 WordPress 之前请确定本站域名,否则后期更换比较麻烦1
2
3
4
5
6
7
8
9
10
11
12
13
14
15
16
17
18
19
20
21
22[root@localhost ~]# mkdir wordpress
[root@localhost ~]# cd wordpress
[root@localhost wordpress]# wget https://wordpress.org/wordpress-4.9.5.tar.gz
[root@localhost wordpress]# md5sum wordpress-4.9.5.tar.gz
f009061b9d24854bfdc999c7fbeb7579 wordpress-4.9.5.tar.gz
[root@localhost wordpress]# tar xf wordpress-4.9.5.tar.gz
[root@localhost wordpress]# mv wordpress /opt/nginx/html/li-chunli
[root@localhost wordpress]# chown -R nobody:nobody /opt/nginx/html/li-chunli/
[root@localhost wordpress]# /opt/nginx/sbin/nginx -s stop
[root@localhost wordpress]# /opt/nginx/sbin/nginx
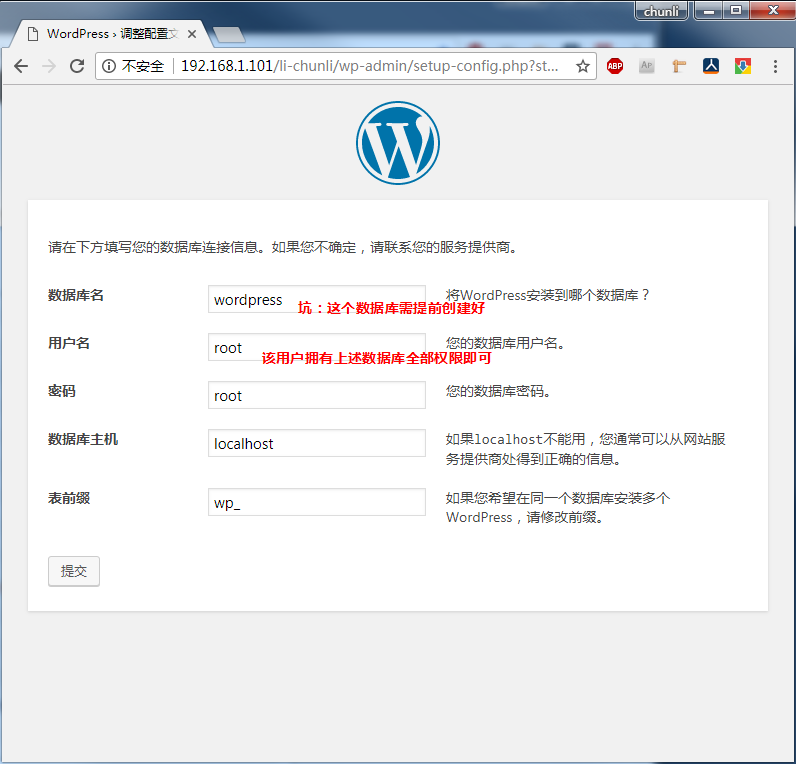
wordpress 要求手动创建一个数据库, 比如名为 wordpress
[root@localhost ~]# /opt/mariadb/bin/mysql -p
Enter password: 输入新的密码
MariaDB [(none)]> CREATE DATABASE wordpress CHARACTER SET utf8;
MariaDB [(none)]> exit
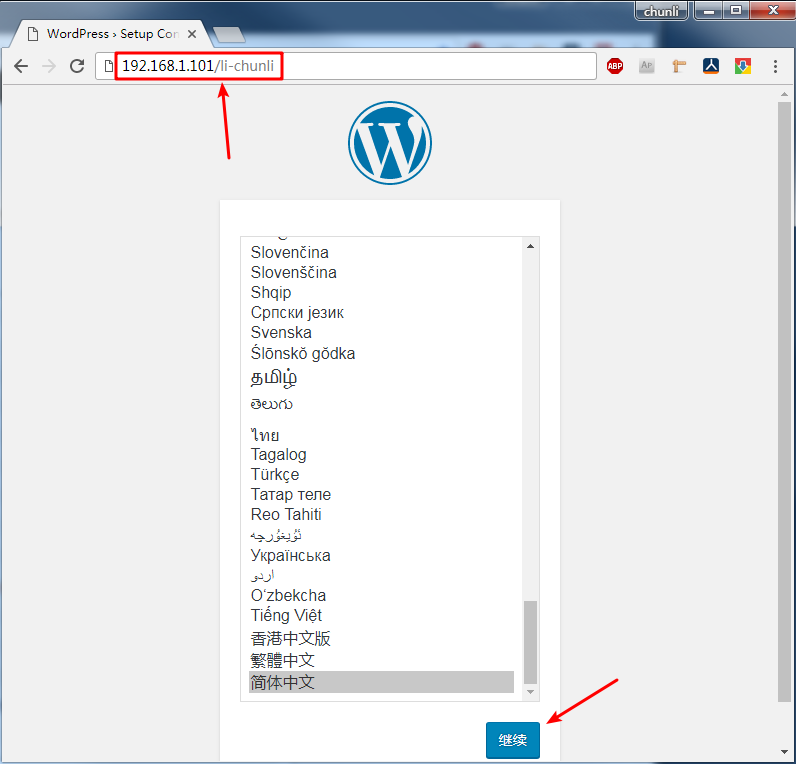
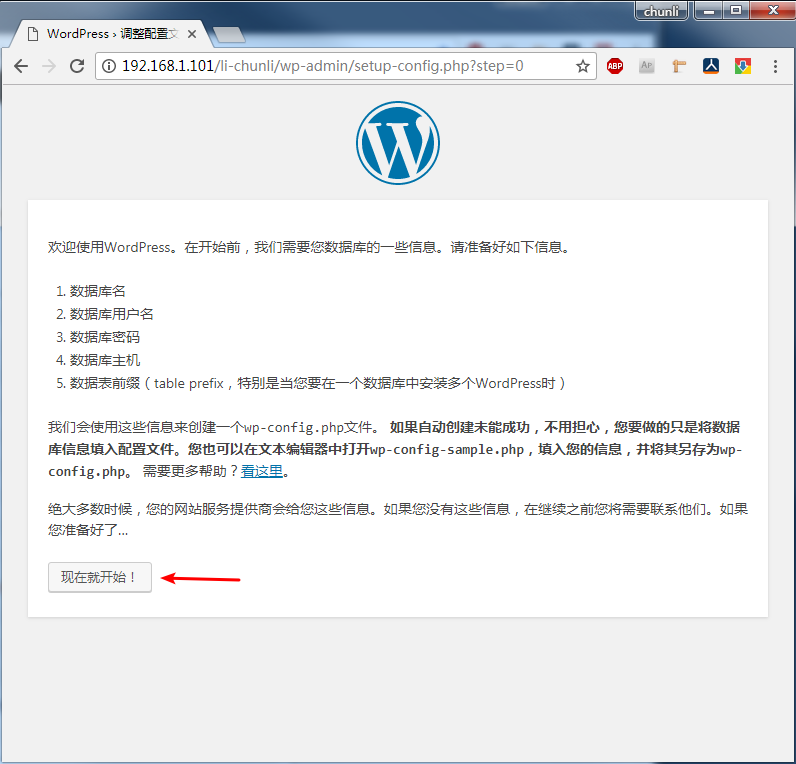
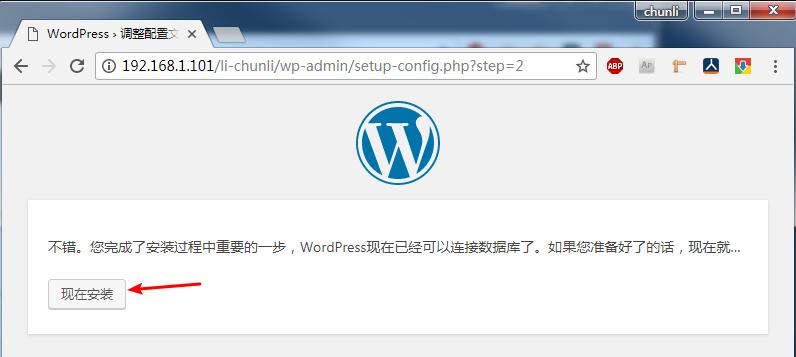
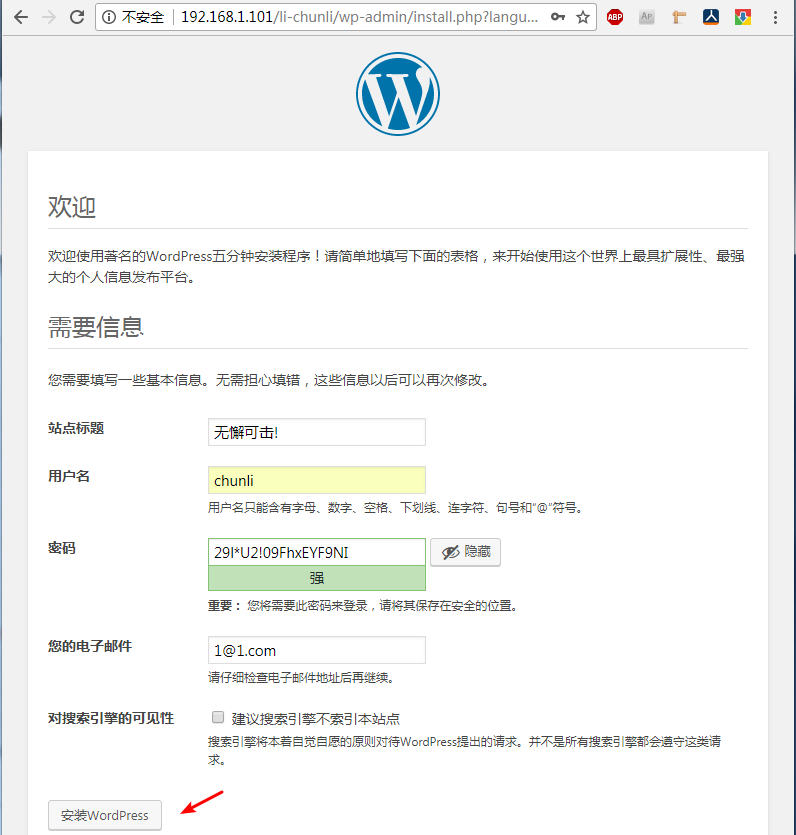
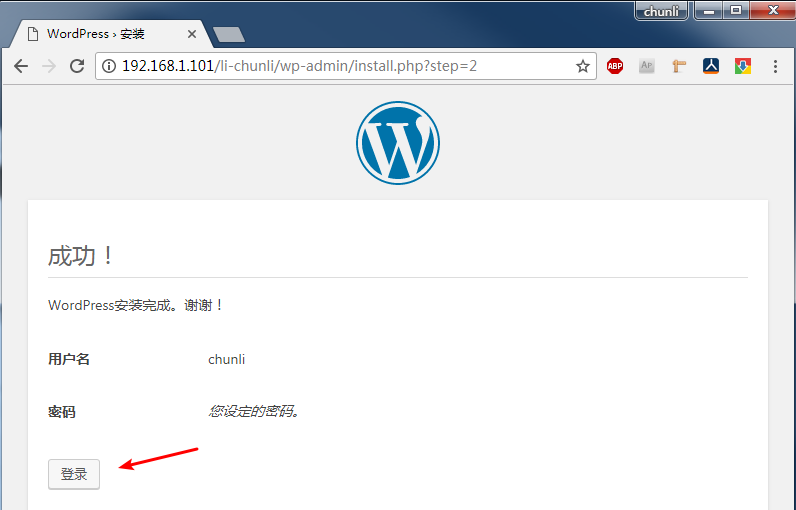
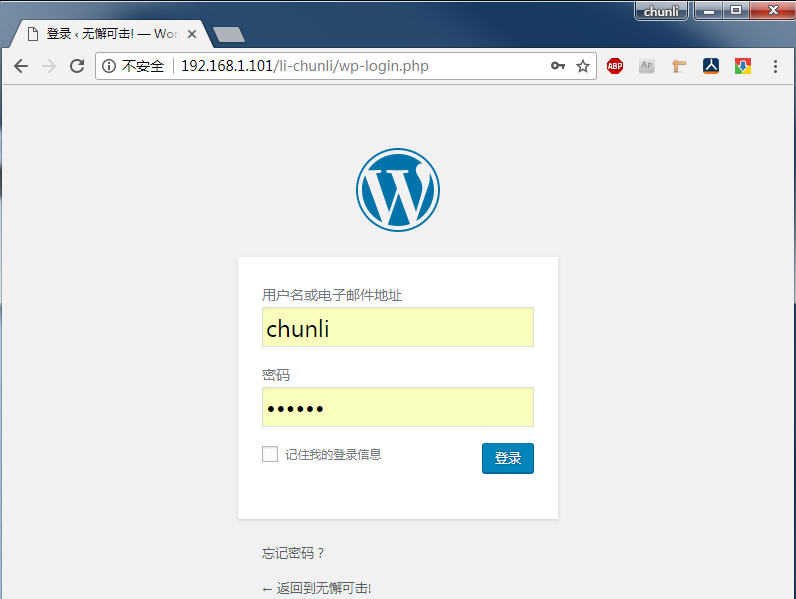
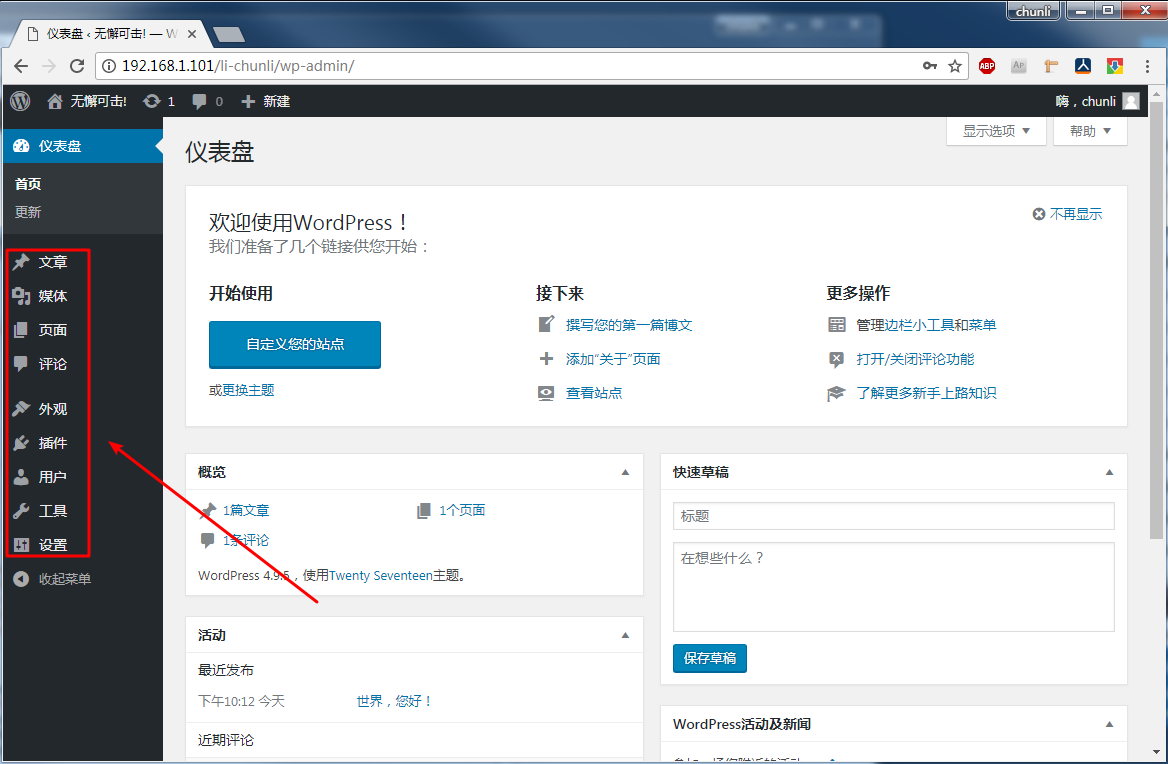
网页操作安装
http://your_server_ip/li-chunli/wp-admin/setup-config.php
坑:确保 nginx 能够解析 php, 比如 index index.html index.htm index.php;
启用Crayon Syntax Highlighter
查找并安装 代码高亮插件Crayon Syntax Highlighter
启用主题 leento
此主题非常精简
修改主题页面宽度
1 | |
leento 主题 禁用缩略图
1 | |
WordPress 这样就安装好了
优化 nginx 开启 SSL

1
2
3
4
5
6
7
8
9
10
11
12
13
14
15
16
17
18
19
20
21
22
23
24
25
26
27
28
29
30
31
32
33
34
35
36
37
38
39
40
41
42
43
44
45
46
47
48
49
50
51
52
53
54
55
56
57
58
59
60
61
62
63
64
65
66
67
68
69
70
71
72
73
74
75
76
77
78
79
80
81
82
83
84
85
86
87
88
89
90
91
92
93
94
95
96
97
98
99
100
101
102
103
104
105
106
107
108
109
110
111
112
113
114
115
116
117
118
119
120nginx 配置文件检测
[root@localhost ~]# /opt/nginx/sbin/nginx -t #nginx 配置文件检测
nginx: the configuration file /opt/nginx/conf/nginx.conf syntax is ok
nginx: configuration file /opt/nginx/conf/nginx.conf test is successful
nginx 配置 SSL
[root@localhost ~]# vim /opt/nginx/conf/nginx.conf
server {
listen 80;
server_name blog.reconnect.top;
rewrite ^(.*)$ https://${server_name}$1 permanent;
...
}
rewrite 80 转转到 443 端口
解除 ssl 注释,并 适当添加
server {
listen 443 ssl;
server_name blog.reconnect.top;
ssl_certificate /opt/nginx/SSL/blog.reconnect.top-ca-bundle.crt;
ssl_certificate_key /opt/nginx/SSL/blog.reconnect.top.key;
ssl_session_cache shared:SSL:1m;
ssl_session_timeout 5m;
ssl_ciphers HIGH:!aNULL:!MD5;
ssl_prefer_server_ciphers on;
location / {
root html;
index index.html index.htm index.php;
}
location ~ \.php$ {
root html;
fastcgi_pass 127.0.0.1:9000;
fastcgi_index index.php;
fastcgi_param SCRIPT_FILENAME /opt/nginx/html/$fastcgi_script_name;
include fastcgi_params;
}
}
添加:
server_name
ssl_certificate
ssl_certificate_key
location 的 index.php
注意坑:需要一个域名,如: blog.reconnect.top
需要公钥,私钥文件路径
我将PHP也添加到这里了
验证:
[root@localhost ~]# 将域名blog.reconnect.top解析到这台机器上
[root@localhost ~]# curl -v http://blog.reconnect.top/index.php
* About to connect() to blog.reconnect.top port 80 (#0)
* Trying 192.168.1.100...
* Connected to blog.reconnect.top (192.168.1.100) port 80 (#0)
> GET /index.php HTTP/1.1
> User-Agent: curl/7.29.0
> Host: blog.reconnect.top
> Accept: */*
>
< HTTP/1.1 301 Moved Permanently
< Server: nginx/1.14.0
< Date: Mon, 30 Apr 2018 01:31:08 GMT
< Content-Type: text/html
< Content-Length: 185
< Connection: keep-alive
< Location: https://blog.reconnect.top/index.php
<
<html>
<head><title>301 Moved Permanently</title></head>
<body bgcolor="white">
<center><h1>301 Moved Permanently</h1></center>
<hr><center>nginx/1.14.0</center>
</body>
</html>
* Connection #0 to host blog.reconnect.top left intact
[root@localhost ~]#
可以看到,被 Location 到 https://blog.reconnect.top/index.php
[root@localhost ~]# curl -v https://blog.reconnect.top/index.php
* About to connect() to blog.reconnect.top port 443 (#0)
* Trying 192.168.1.100...
* Connected to blog.reconnect.top (192.168.1.100) port 443 (#0)
* Initializing NSS with certpath: sql:/etc/pki/nssdb
* CAfile: /etc/pki/tls/certs/ca-bundle.crt
CApath: none
* Server certificate:
* subject: CN=blog.reconnect.top
* start date: Apr 28 00:00:00 2018 GMT
* expire date: Apr 28 12:00:00 2019 GMT
* common name: blog.reconnect.top
* issuer: CN=Encryption Everywhere DV TLS CA - G2,OU=www.digicert.com,O=DigiCert Inc,C=US
> GET /index.php HTTP/1.1
> User-Agent: curl/7.29.0
> Host: blog.reconnect.top
> Accept: */*
>
< HTTP/1.1 200 OK
< Server: nginx/1.14.0
< Date: Mon, 30 Apr 2018 01:31:56 GMT
< Content-Type: text/html; charset=UTF-8
< Transfer-Encoding: chunked
< Connection: keep-alive
< X-Powered-By: PHP/7.2.5
<
<!DOCTYPE html PUBLIC "-//W3C//DTD XHTML 1.0 Transitional//EN" "DTD/xhtml1-transitional.dtd">
<html xmlns="http://www.w3.org/1999/xhtml"><head>
<style type="text/css">
OK HTTPS 完成了。
优化 解除文件上传限制
1 | |
